

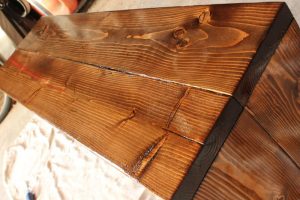
If you take the time to prepare your wood in the right way, dyeing the wood is super easy. Some types of wood will become mottled after adding stains, so it is important to use wood care agents before using colors. Spread the paint evenly on the wood, and then wipe off the excess. After the stain is dry, add sealant to protect your wood. Check carefully whether your wood care agents, paints, and bonds are compatible so that you will get beautifully stained wood.
Choosing stains and care agents
Choose mutually compatible dyes and care agents. This means that they should all have the same foundation. If you choose an oil-based colorant like Varathane, you need to choose an oil-based conditioner and sealant. Water-based colors require water-based products to cooperate.
Choose oily colorants and care agents to enhance the color of the wood. Oil-based paints are the most popular, and they are usually the easiest to apply to wood. They can also penetrate deepest into the wood, giving the wood a good depth and beautiful color. Although they are easy to use, they do not protect the wood, so you need to add a final sealant layer if you choose oily products.
Choosing water-based products is an environmentally-friendly choice. Water-based stains are easy to clean and are more resistant to things like mold and mildew. These products do not create rich colors like oil-based products, but they can maintain color for a long time.
Choose a gel stain to get the color that stays on the surface of the wood. Gel stains will not penetrate the surface of the wood, which means they will bring out some wood marks, but mainly as a layer of paint. They are very suitable for wood types that usually become mottled with the addition of colorants, such as maple, pine, cherry, and birch.
Test your stain on a piece of scrap wood to see how effective it is. If possible, find a small piece of wood of the same type as the wood you want to paint. Use a rag to smear the stain on the test piece of wood and see how light or dark it is.
Sanding and conditioning wood
Sand the wood with 120 grit sandpaper. Rub the wood along the grain direction with sandpaper. After you sand the whole piece of timber evenly, wipe off the dust with a clean cloth.
Change to 220 grit sandpaper to form a uniform surface on the wood. Use higher sandpaper for the second round of sanding. Repeat the same process with No. 120 sandpaper and wipe the entire surface before removing excess sawdust with a clean rag.
Brush a thin layer of care agent on the surface along the direction of the wood grain. Dip the wood care agent with a natural brush, rag, or sponge, and apply it evenly on the wood. Apply a thin layer of wood care agent evenly on the whole piece of wood.
Wait for 10-15 minutes. After the conditioner is absorbed, wipe off the excess conditioner. Use a clean cloth to wipe off the extra wood conditioner gently. Wipe with small brush strokes, rubbing in the direction of the wood grain.
Let the curing agent dry for 30 minutes and dye the wood within 2 hours. Set a 30-minute timer so you can know when the wood should dry. Try to apply the color within 2 hours after the wood care agent dries to achieve the best results.
Application of stain
Sand the wood with 220 grit sandpaper. After the wood curing agent is dry, sand the wood with 220 grit sandpaper or higher. Follow the direction of the grain and use a clean cloth to wipe off the dust generated during sanding.
Use a rag or brush to apply the stain on the wood. Mix your stain tank thoroughly with wooden or plastic mixing utensils. Dip the color with a rag or brush, then use it to the wood, and apply it in sections. The direction of applying it is the same as the wood grain.
Apply the colorant thinly and evenly on the wood. Brush or rub the stain on the wood with long brush strokes. Don’t worry about whether the color is perfect because you will wipe off most of the paint. Focus on ensuring that there are no significant streaks or splashes of stains anywhere on the wood.
Wipe off the excess dye after 5-15 minutes, depending on the shade you want. The longer the paint stays on the wood, the darker the color will be. Wipe off the excess stain with a clean rag, and gently wipe the wood along the grain direction to wipe off the leftover paint. To be thorough, rub the color into the wood to form a thin, uniform layer of stain.
After allowing the stain to dry for 4 hours, add additional coatings if needed. Within 4 hours of drying, let the wood lay flat in a well-ventilated place. If you decide you want to make it deeper, apply another layer of dye along the direction of the texture, wait for 5-15 minutes to absorb it, and then wipe it off with a clean cloth.
Treat the wood with a sealant.
Choose a finish coating to protect your wood by sealing. Although you don’t have to fill your wood, it is recommended if you want your work to last a long time and remain durable. Protective coatings like polyurethane work well and can be found in hardware stores or online. Use a wooden or plastic stick to gently stir the finish coating, using slow, gentle movements.
Use a natural brush to apply the sealant to the wood. Dip the brush into the sealant tank and brush it onto the wood in the direction of the wood grain. Cover the whole piece of wood evenly with a thin protective layer.
If necessary, wait 3-4 hours, and then polish it again when the sealant is dry. Now, If you let the protective layer dry for 4 hours, you think it is finished, excellent! If not, lightly sand the surface layer with 220 grit sandpaper, and then wipe the dust off with a clean cloth. Apply a second coat of sealant and let it dry completely. Repeat the process of applying the glue, and use a layer evenly and thinly along the direction of the lines. Wait another 4 hours for it to dry, and then decide whether to finish or apply another coat.
Also read: How to record google meet.


